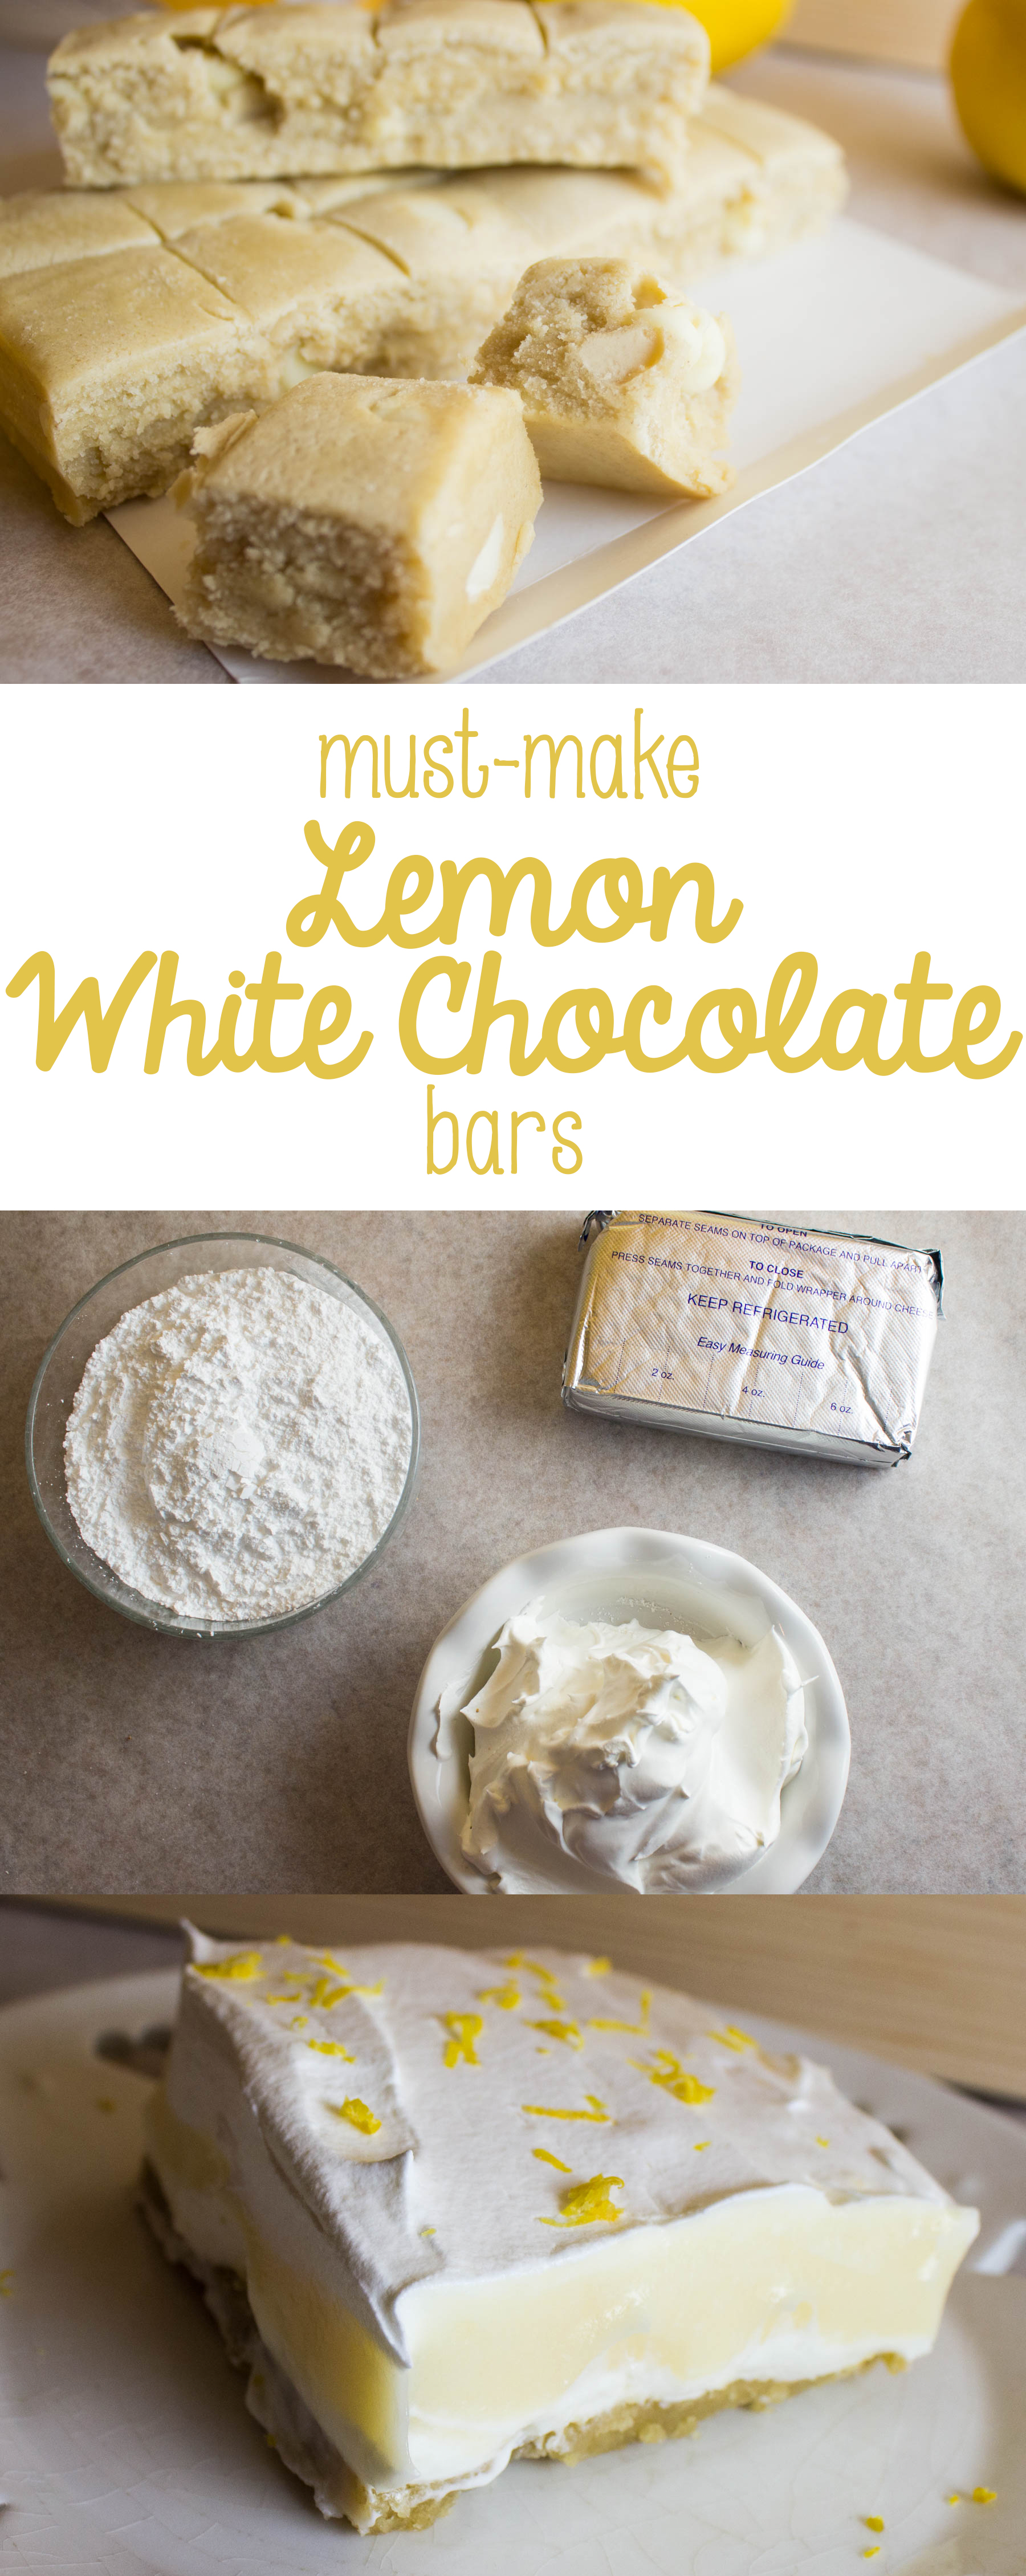
Lemon Icebox Cake

Hate turning on your oven in the summer? Try this lemon icebox cake-- it's no-bake, semi-homemade, and only takes minutes to prepare. It's perfect for potluck desserts!

hate turning my oven on in the summer if I an avoid it. For me, summer is the time for fresh salads, using the fridge, and sometimes the crock pot, as my main source of cooking power. That’s why I love this lemon icebox cake– it takes no heat at all, meaning you’re staying nice and cool while cooking and while eating. Plus, it’s semi-homemade, so it only takes a few minutes to prepare. What’s better than that?

Hate turning on your oven in the summer? Try this lemon icebox cake-- it's no-bake, semi-homemade, and only takes minutes to prepare. It's perfect for potluck desserts!

Start the cake by placing a layer of graham crackers (honey flavor works best!) in the bottom of a 9×13 pan.

Hate turning on your oven in the summer? Try this lemon icebox cake-- it's no-bake, semi-homemade, and only takes minutes to prepare. It's perfect for potluck desserts!

Here’s the hardest part of the recipe… are you ready? The hardest part of this recipe is to mix powdered sugar, softened cream cheese, and whipped topping.

Hate turning on your oven in the summer? Try this lemon icebox cake-- it's no-bake, semi-homemade, and only takes minutes to prepare. It's perfect for potluck desserts!

That’s it. Simple enough for a busy summer day?

Hate turning on your oven in the summer? Try this lemon icebox cake-- it's no-bake, semi-homemade, and only takes minutes to prepare. It's perfect for potluck desserts!

Spread the mixture onto your graham crackers to form the second layer of the cake.

Hate turning on your oven in the summer? Try this lemon icebox cake-- it's no-bake, semi-homemade, and only takes minutes to prepare. It's perfect for potluck desserts!

Top that with a layer of graham crackers. I seriously love graham crackers for snacking, but they become the perfect substance to this cake to make it a delicious treat.

Hate turning on your oven in the summer? Try this lemon icebox cake-- it's no-bake, semi-homemade, and only takes minutes to prepare. It's perfect for potluck desserts!

You can use homemade lemon curd here, but that kind of defeats my “no heat” mantra, and it’s kind of a pain in the booty, so I just use my favorite store-bought lemon cream for this recipe! You’ll want a full can of it.

Hate turning on your oven in the summer? Try this lemon icebox cake-- it's no-bake, semi-homemade, and only takes minutes to prepare. It's perfect for potluck desserts!

Spread that evenly over your graham cracker layer. Look at that beautiful lemon yellow! Doesn’t it look refreshing? I fully give you permission to lick the spoon after this layer– I know I did (I promise I got a new spoon to finish the recipe!)

Hate turning on your oven in the summer? Try this lemon icebox cake-- it's no-bake, semi-homemade, and only takes minutes to prepare. It's perfect for potluck desserts!

Top the lemon layer with… you guessed it, more graham crackers. You see, the graham crackers make the “cake” layers as they soften between the creamy layers, making a perfect layered cake with NO baking. Hooray for staying cool!

Hate turning on your oven in the summer? Try this lemon icebox cake-- it's no-bake, semi-homemade, and only takes minutes to prepare. It's perfect for potluck desserts!

Top the whole thing with the rest of your whipped topping, then place it in the fridge for about 2-3 hours before slicing and serving.

Hate turning on your oven in the summer? Try this lemon icebox cake-- it's no-bake, semi-homemade, and only takes minutes to prepare. It's perfect for potluck desserts!

To me, there’s just something really summery about lemons. Probably the thought of sitting on the front porch sipping a tall glass of lemonade, or just enjoying a lemon sorbet. It just whispers “summertime,” and that’s what makes this dish so special– the hint of lemon just makes it so summery.

Lemon Icebox Cake
Serves 12
No oven? No problem. This icebox cake doesn't require you to heat up the house-- just layer and chill!
Write a review
Print
Prep Time
5 min
Cook Time
3 hr
Prep Time
5 min
Cook Time
3 hr
Ingredients
  1. 1 box Honey Graham Crackers
  2. 1 cup Powdered Sugar
  3. 1 package Cream Cheese, softened
  4. 1 can Lemon Curd or Lemon Creme Pie Filling
  5. 1 (8 oz) container Cool Whip or other whipped topping, divided
Instructions
  1. Place 1/3 of the crackers in a single layer on the bottom of a 9x13 pan.
  2. In a bowl mix 1 cup Cool Whip, 1 cup powdered sugar, and 1 package cream cheese, reserving the remainder of the Cool Whip.
  3. Spread mixture on top of graham crackers carefully.
  4. Top with a second layer of graham crackers.
  5. Spread entire contents of lemon pie filling over cracker layer.
  6. Top with a third layer of graham crackers.
  7. Top with remaining Cool Whip.
  8. Chill for 2-3 hours before serving, or until graham crackers are slightly softened.
Mama Plus One https://www.mamaplusone.com/

If you LOVE all things summer, you’ll love these Bacon Wrapped Cheeseburger Dogs, another make-ahead dish perfect for summer cookouts. Don’t forget to try my Crystal Light Ice Cream, too (I used a sour apple flavor, but try it with a lemonade packet instead!)

Of course, you can also check out this awesome pinterest board with some of the best summertime eats!

Follow MamaPlusOne’s board Summertime Gladness: Eat on Pinterest.

What flavor screams summertime to you? Let me know in the comments below!

Must-Make Lemon White Chocolate Toll House Cookie Bars

This shop has been compensated by Collective Bias, Inc. and its advertiser. All opinions are mine alone. #EasterEssentials #CollectiveBias

The Easter season can be crazy busy... drop in guests, fitting meals between egg hunts and events and beautiful weather. Make life easier at Easter by getting your #EasterEssentials taken care of with Nestle! Try these must-make lemon white chocolate bars, using pudding, whipped cream, and lemon white chocolate chip Toll House cookie dough! They're quick and easy, so you can get back to your busy season. #ad

The Easter season is upon us. Can you believe it? I certainly can’t– this year is flying by! One of the things I love about springtime, and about the Easter season, is that the weather is nice and you can finally get out. No more snow to hold you back from visiting friends and neighbors or just enjoying the great weather. But between egg hunts, time with family, and those drop in guests, the Easter season is busy. Who has time to bake during all of that craziness? You. That’s who. Because these awesome lemon white chocolate bars are semi-homemade using NESTLÉ® TOLL HOUSE® White Chip Lemon Refrigerated Cookie Dough, making them quick and easy to prepare (especially if you have unexpected company)!

Read more

Lemon Poppyseed Breakfast Rolls

Oh, honey. I don’t even know where to begin with these breakfast rolls. They’re so simple. They’re so versatile. They’re perfect for breakfast or brunch or after dinner or anytime, and they’re just so refreshing and really, really simple to make. If you’re like me, you open your pantry door and you have a variety of cake mixes for “just in case.” You know the story– just in case someone in the church has a baby and you need to whip up a quick cake, or just in case you forgot it was someone’s birthday and you need to make something quickly, or just in case you see a to-die-for recipe using a cake mix on Pinterest.

Well, darlings… these simple Lemon Poppyseed Breakfast Rolls are going to make use of that Lemon cake you have tucked in the back of your pantry, somewhere behind the Funfetti and Chocolate mixes. And trust me, you’ll be stocking up on Lemon cake mix after you try this, because it’s oh-so-yummy.

Read more

How to Make Fruit Stripe Cupcakes

Remember that pack of gum that you always begged your parents to buy you, the Fruit Stripe kind with the Zebra on the package and the tongue tattoos? Even though the flavor faded within the first 30 seconds, it was the coolest gum ever. It didn’t matter if it ended up flavorless by the end, as long as you had the tongue tattoos and the Zebra to get you by.

Yeah, these cupcakes are kind of like that, except the flavor doesn’t fade at all. Packed with stripes of fruity flavor, these have all of the nostalgia of the zebra stripes, with none of the downsides. Sadly, tongue tattoos are not included.

I’m going to say right off the bat, this isn’t a recipe. You can do this with literally any cake mix you love, provided you have enough of it to divide it into two batches. However, I love using the Duncan Hines Spring Velvets because they’re pre-colored, which is no work for me, and they’re nice and rich, even before you add in the fruit flavored extracts.

To make fruit stripe cupcakes, you’ll need your ingredients for your cake (listed on the box, or as spelled out in your own personal favorite recipe; the Duncan Hines Spring Velvets take 2 eggs, some water, and half a stick of butter per cake mix included in the box), one fruit flavored extract for each color you’re using, and some fun toppings… I chose Cool Whip and these beautiful SweetWorks Pearls to add a pretty springtime touch.

One basic thing you’ll want to remember about making Fruit Stripe Cupcakes is to make sure your flavors are complimentary. You probably DON’T want to do Lemon and Root Beer extracts in one cupcake, right? Nevermind that Root Beer isn’t a fruit anyway. If it were, they’re just not compatible flavors. Consider flavors that work well together– chocolate and strawberry, lemon and raspberry, etc. I decided to go with lemon and raspberry for my cupcakes to make a raspberry lemonade flavor mix.

Make your first mix according to package directions or recipe, and, if it’s a white cake, go ahead and tint it the color of your choosing. Since I was using the Duncan Hines Spring Velvets that are already yellow and pink, I didn’t need to add any food coloring to the mix. It’s at this point that you’ll choose one of your extracts and add in about a teaspoon, to taste. I decided to make the lemon yellow, because, well… that just makes sense. Set that aside.

Repeat the process with your second cake mix, adding in your chosen flavor, about a teaspoon or to taste. I used the Raspberry flavoring in the pink mix, again, because it made sense. It was really convenient to buy the Spring Velvets mix because the colors looked perfect side-by-side and didn’t need any food coloring. Plus, who can resist that perfect texture?

Now, you’ve got two mixes with two different flavors and colors, which will create an awesome striped effect inside the cupcake and allow the flavors to swirl seamlessly. You’ll start by lining your cupcake pans with cupcake liners of choice, then grabbing a tablespoon and a teaspoon, or figure out how to eyeball it.

Start with a tablespoon of each cake mix in your cupcake liner, one on top of the other. Don’t spread it out or anything, just let it do it’s thing. It’ll stripe on it’s own. If some of your mix falls more to one side than the other, that’s okay. That’s part of the charm of these cupcakes. What I like to do is make sure that if I started one on pink, I started the next on yellow, then back to pink, to really add to their character. Which means one cupcake would be yellow-pink-yellow-pink, and the next pink-yellow-pink-yellow.

Add a teaspoon of each batter on top of the tablespoons, continuing the pattern. As you can see, when you add the next bit of batter, it starts to make the lower parts spread out, filling the liner and moving the mixes a bit to give it it’s own swirl and character. Every cupcake will be different.

Bake your cupcakes according to recipe or package directions. As you can see, every cupcake’s top looks different from the next, and each one has it’s own swirl and character lurking beneath the surface. When you bite in, you’ll get both flavors at once, but in varying intensities as you get through the cupcake, giving it a unique flavor that makes every bite better than the last, versus just putting both extracts into a mix and making a cupcake with the whole flavor throughout.

Once cooled, frost and decorate your cupcakes. I personally went with piped Cool Whip because it complimented the fruit stripe flavor without overcomplicating it or overpowering it.

Plus, it looks so deliciously inviting when swirled on top!

And who could resist adding some of the SweetWorks Pearls on top? For an easy spring display, add some Easter basket grass or shredded paper to a cupcake tree, then nestle the cupcakes into the grass. Bonus? You can use out-of-season cupcake liners and no one will notice if they’re hidden beneath the grassy display.

To be honest, these cupcakes are so delicious and inviting that my family couldn’t even wait until I was done photographing them for the blog before trying to snatch them up.

Luckily, my little guy’s thievery gave you a chance to see a cross-section of the cupcake and show you how every cupcake is unique, and each bite will contain it’s own swirl of flavors unique to that bite.

The flavor will depend on where you bite into the cupcake, and what flavors are on that section of the cupcake. Isn’t that cool?

These totally took me back to the fruit stripe days of my childhood, and made me realize that these great cupcakes could be tailored to any party colors and theme. Chocolate mint cupcakes for tea, raspberry lemonade for a summery party, root beer and vanilla for a backyard barbeque, and any color choices you like. They’re surprisingly easy to make, too.


What flavor would you make? Let me know in the comments below!

(Almost) Starbucks Lemon Cake Pops

Springtime. Seriously, is there anything better?

Today, I was telling a friend how a song I can’t get enough of right now (Gone Gone Gone by Phillip Phillips if you’re curious) makes me feel like it’s 75 degrees out, and like I’m driving with the windows down, hair blowing in my face, sipping an iced coffee and wearing sandals. Even though it’s still officially long-sleeves and heater on weather, I feel spring when I hear that song.

You know what else gives me that feeling? Lemon cake pops. Oh my gosh. It doesn’t matter what diet plan I’m following, Lemon Cake Pops from Starbucks are one thing I just can’t say no to. Which means every time I head to Target or my local grocery store, I end up buying a Lemon Cake Pop. See, the thing about lemon is, it truly gives me that “Windows-down, Radio-up” feeling that I love.

But I knew there had to be a way to capture that feeling at home, so I wouldn’t have to drive up to Starbucks to get one. I mean, I’m lazy, and 15 minutes is a long drive. Plus, there had to be a way to make them cheaper!

Seriously, if you’re looking for an exact duplicate, these are spot on. In fact, they may actually be even better than the real deal. So what is a lemon cake pop? Well, according to the Big Bucks themselves, it’s a vanilla white cake with lemon buttercream, dipped in white chocolate and topped with sugar sprinkles. So, to make a good duplicate, mine should be the same basic type of pop.

For the white cake base, I went with a Betty Crocker White Cake Mix, and the supplies listed on the back of the box. While yes, you could go totally homemade with a white cake, boxed cake is perfect for this recipe. It’s moist, it’s quick to prepare, and it just streamlines the process.

For the lemon buttercream, I decided to tweak things and make my favorite lemon cream cheese buttercream recipe, which uses cream cheese, butter, powdered sugar, and lemon and vanilla extracts.

To give the pops that signature yellow color white chocolate, instead of tinting a white chocolate, I decided to use these beautiful yellow Wilton Candy Melts! They’re the perfect color for these lemon cake pops, and they don’t require having the white chocolate and a gel color on hand.

Finish with pretty sugar sprinkles (I picked these up for $1 at Target) and you’ll be all set. If you’re making them into actual pops, you’ll want to make sure you have cake pop sticks on hand. If you’re like me and prefer to make balls, you might consider some pretty mini cupcake liners or truffle wrappers. Mine are from Wilton, and oh-so-cute!

Start by making your white cake according to package directions (or from scratch if that’s how you roll). For Betty Crocker mixes, that means 3 egg whites, 1 1/4 C water, and 1/3 C oil with the mix, baked at 350 for 29-34 minutes.

One way that white cakes get their signature white appearance is the lack of egg yolk in the batter. Yolks will tinge it slightly yellow, so pretty much all white cake mixes will use more eggs, but only the whites of each.

Once you’ve baked your cake, let it cool completely. If it’s even a little warm, the frosting will melt when mixed with it and give you mush. So patience is a virtue!

In the meantime, start your lemon cream cheese buttercream. You’ll want 1 block of room-temperature cream cheese (8 oz), 2 sticks of butter (1 cup), 1 teaspoon of pure vanilla, and 2 teaspoons of lemon extract. While lemon is a personal taste and you might like yours slightly more or less lemony, I’ve found that, side-by-side, 2 teaspoons tastes most comparable to the real deal when the pops are fully finished. Remember, you won’t want the lemon to overpower the vanilla of the white cake, but you will also want to make sure that the white cake doesn’t overpower the lemon. A delicate balance, for sure!

Cream this together until it’s nice and fluffy, very well whipped.

Slowly beat in 3 1/2 cups of powdered sugar, whipping it with a mixer until it’s perfectly creamy. This is about the look you’re going for.

When the cake is fully cooled, crumble it to bits. I mean just destroy it. Then, add in a couple of spoonfuls of the frosting. Stir and smush until it’s fully combined, then continue squishing until it combines into a thick dough, adding slightly more frosting if needed.

{Side note: You will have some leftover frosting, which you can use with additional baked cakes for more cake pops, eat it as-is, or top some cupcakes or a cake with it. Personally, I like layering crumbling graham cracker crumbs in the bottom, then cake and frosting in mini cordial glasses and serving them with a mini tasting fork for a “cake shot.” It’s a great way to use a variety of leftover frosting!)

When the dough is ready, chill it for about 15-30 minutes before rolling it into balls, then once you’ve rolled all of the dough into quarter-sized balls, go ahead and pop those in the freezer for about 30 minutes.

Melt your yellow Wilton Candy Melts. I like to use a double boiler, but you can absolutely melt the candy melts in the microwave if you’d prefer.

Dip your chilled cake balls in the melted white chocolate, coating it, then removing it. If you’re making cake pops, your technique will be slightly different from mine using a fork. Place the dipped balls on parchment or waxed paper, then sprinkle with the sprinkles before the chocolate hardens.

Don’t worry, though– if the chocolate does harden, you can use drip some more chocolate on the cake ball and sprinkle after.

For a fun party display, you can put a block of foam in the base of a watering can (I got mine for $3 at Target’s One Spot), cover it in Easter grass or shredded paper, and either stick your cake pops directly into the foam, or stack your cake balls carefully. Wouldn’t that look fun as a dessert buffet centerpiece or as a delicious gift?


In the comments below, tell me, what makes you have that springtime feeling, even when it’s not spring yet?