Once a child outgrows the baby food stage, it can be tough deciding what to feed them. With my own son, I try to make sure he’s eating a great, balanced diet. Mind you, he enjoys pizza crusts and chocolate pudding, so he gets a bit of “junk food” from time to time, but I’ve found a few ideas and tips to keep food as healthy as possible.
Those who know me know that his purees have all been homemade. I understand why families choose to use Gerber and Beech Nut foods- I truly do. However, when I was pregnant with Zach, I made the decision that the best choice for our family was to have homemade purees. I hope that no one takes offense to the fact that I am a very homemade-feeder, because I’m not condemning anyone who chooses to feed their children store-bought foods! In fact, I give Zach some storebought foods (my favorites are Plum Organics, Ella’s Kitchen, and HappyBabyFood).
It’s really easy to think about healthy eating for adults- we all know how to read a Food Pyramid (well, I guess now it’s a “food plate,” but, I grew up in the Food Pyramid years and I don’t adapt to change well!) We also know that eating a variety of colors is good for us…
Red food helps provide lycopene, which is excellent at fighting heart disease. Greens are typically very high in fiber, and they provide antioxidants that help vision. Blues and Purples have phytonutrients that help promote healthy brain functions. Yellow and orange foods help boost the immune system with protective antioxidants.
The same principles are true for children- it’s important for them to eat a variety of foods in a variety of colors. Giving babies solid foods (after the doctor has approved it, of course) also helps them to stay fuller longer, which I personally have found means that Zach isn’t waking up as much because he stays fuller overnight.
I’m not a nutritionist or a doctor- I’m a mom- so please take what I have to say with a grain of salt (and always pass information through your doctor to find out his/her specific recommendations).
These are just my tried and true tips for helping your tot get plenty of different colors and food groups in a day.
Zach’s primary source of food is breastmilk. It provides the essential nutrients he needs, as well as providing plenty of things to boost his eyesight, his brain function, and more. In order to make sure he is getting plenty of healthy nutrients in his breastmilk, it’s important that I pay attention, first and foremost, to what I eat. Because this doesn’t always happen, his second line of defense is to make sure what he eats is a good healthy mix of foods. When I feed him, I try to make sure that his meals have an inviting presentation… even if he destroys my “food art” the second he sits down, it helps him see all of the fun colors and textures I’ve provided for him. Additionally, I’m not afraid of “messy” foods- I just try to plan messy foods near bathtime (so, most of the time, the messy stuff is served for dinner instead of lunch).
Messy play helps to encourage creativity, while stimulating the brain and boosting confidence. I know it seems odd that all of those things can be tied in together, but they are!
In order to show you how I serve Zach a variety of foods, here’s an example meal plan for him.
Breakfast
Single-grain cereal (oatmeal) mixed with fruit puree (homemade- bananas, peaches, apples, blueberries, a mixture, etc) and yogurt (plain or vanilla- NO HONEY!)
Lunch
String cheese (1/2 a piece, typically, torn into long strips that he can easily pick up himself), 1 piece whole grain or whole wheat toast (cut into triangles, no crusts) spread with fruit puree (organic pouch or homemade- I try to alternate between vegetables and fruits, or do half and half- he particularly likes sweet potatoes, the PlumOrganics Peach MishMash, bananas, or apple-blueberry blends), a few yogurt bites (we like HappyBaby Yogis), some cheese puffs (we like HappyBaby Organic Carrot and Cheese or Broccoli and Cheese puffs), some fruit puffs (we like PlumOrganics Superpuffs- I vary his colors every day over a week, or mix a few colors together at lunchtime), and a few sweet potato fries.

Dinner
Sometimes he’ll eat a pre-meal of some sweet potato fries, since he sometimes gets hungrier while dinner is cooking. Typically, he eats what we’re eating- if it’s spaghetti night, he may have a piece of toast spread with some homemade spaghetti sauce, some ground beef, and some mozzarella string cheese. If it’s pot roast, he’ll usually have some potatoes and carrots, and some roast that I’ve shredded. On homemade chicken and noodles night, he gets some noodles, some veggies, and some chicken from the soup. At dinner, I try to encourage him to drink from a cup, so I also give him some breastmilk in a cup- he has my help drinking it.
Dessert
Zach is a huge fan of desserts, but whenever I can, I try to keep it healthy. One of his favorite things is to eat “ice cream.” I have a Yonanas maker, which is an amazing machine that you feed frozen bananas (as well as other fruits, if desired), and out shoots something the consistency of soft serve. There are no other ingredients like milk or sugar- it’s literally JUST bananas (and any other additives you elect to add- sometimes we’ll toss in blueberries, dark chocolate, or frozen peaches or mangos). He is getting fresh fruit, but he feels like he’s getting an amazing ice cream treat.
Another recipe we’re fond of is ABC Pudding… you take one avocado, four bananas, and 1/4 cup of cocoa powder, and blend it in a blender (if the taste isn’t up your alley, adding a little sugar can help, but I try to keep it as low-sugar as possible for Zach). It’s important after blending to refrigerate it for at least one hour- this lets the pudding flavors blend. Avocados provide essential fats that babies need. Don’t worry about baby foods containing fats- babies need it for proper growth and development! Avocados provide a GOOD kind of fat that is healthy for baby (and for mommy, too). Sometimes, with the ABC Pudding, I’ll mix a little of his cereal in- it adds some texture while also adding some grains if he hasn’t had as many during a particular day.


Snacks
We typically stick to fresh or frozen fruit pieces, sweet potato fries (homemade), and HappyBaby Yogis or some Puffs (fruit, vegetable, or cheese-vegetable) from HappyBaby or Plum Organics.
So, in one day, Zach is getting multiple colors, a good mix of dairy, protein, fruits, vegetables, and grains. He’s also getting breastmilk several times a day (morning nap, afternoon nap, served in a cup with dinner, evening nap, before bed, and once during the night) on demand- if he wants to eat, he eats, and he chooses when he’s going to have breastmilk. I leave that very much up to him (if I pick him up and he’s trying to lift my shirt or grabbing at me, I know he definitely wants breast milk. When he is trying to push it away when I offer it, I know that’s not what he’s looking for). Breastfeeding on demand means he’s getting what he needs, and he is the final deciding factor in when he has breastmilk, and when he doesn’t.
Zach is good about showing when he’s full, and by allowing him to feed himself for several of his meals, he’s able to make it clear when he wants to eat, and when he doesn’t. When he stops feeding himself, he is typically done with his meal. I still try to make sure I’m helping him eat his breakfast, but I think it’s important to encourage him to spoon feed by giving him his own spoon to eat with- we both have spoons. I’ve also found that this eliminates him grabbing the spoon I’m trying to feed him with, which was a sticking point for our previous meals.
As for messy eating, I put a spoonful of pudding on his plate or tray, and he goes to town with a spoon and his fingers. If it ends up on his eyebrows and his ears instead of in his mouth, that’s okay. If it gets spread around the entire tray and he does a finger-painting method, that’s okay. It’s all washable. His clothes, his body, his tray… they can all be cleaned. I want him to get enjoyment out of what he is doing, express his creativity, and be encouraged in that. He learns that pudding tastes a lot better in the mouth than on his eyebrows because he tries putting it both places and experiences that.
Mealtime can help nutrition and self esteem. When I see he is doing a good job with eating, I encourage him by saying “Good job, Zach! You’re eating all of your colors!” We talk about the different colors and textures he gets. “Is that puff crunchy? Yummy!” “That pudding is squishy, isn’t it? I bet that feels funny in your fingers!” “Look- you’ve got purple, red, and green on your tray!” (Point to the colors as you say them). The more words you introduce to describe what he’s eating, the more he’ll learn different terms for those things as well.
I’m not going to say that I’m a perfect parent- there are many days when healthy eating goes out the window. I’m not above sitting my son down with a bag of Cheerios (oddly, he doesn’t care for them) or a little bit of chocolate pudding. I’ve fed him conventional ice cream from my favorite ice cream shoppe before. It’s not the end of the world for him to experience those things, too. But I’ve found the more I encourage him to eat healthy, the more he takes on a preference to that. My son tends to turn his nose up when I’ve given him Gerber (on the go, in an emergency)- it’s just not his preference after having the homemade.
Here are some ideas of what sorts of foods to feed your tot. Make sure what they have is soft enough for them to eat, and able to be chewed reasonably easily.
Dairy String Cheese, Yogurt, Freeze dried yogurt, Puddings made from milk
Protein String cheese, yogurt, meat purees, small chunks of meat
Grains Whole wheat or whole grain bread, strips of tortilla, barley, oatmeal, rice, puffs made for babies, Cheerios
Fats Avocado
Vegetables and Fruits Sweet potatoes (orange), bananas (yellow), smashed or pureed peas (green), green beans (green), pureed or steamed apples, beets (purple), smashed or pureed blueberries (purple), peppers (yellows, oranges, reds), peaches, pears, Puffs made for babies that include fruits and veggies (added into a diet sparingly).
There are plenty of choices for kids to eat, so use your imagination. Make sure you choose items that are easy to gum. If anything is a choking hazard (peas, grapes, etc), make sure you either smash them or puree them, so your child doesn’t choke.
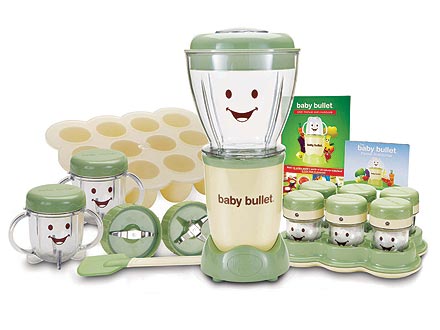
Finally, below is my absolute favorite way to make Zach’s baby food. I’ve found that this works well for purees for him (but I’ve also used it for smoothies for me, or to make salsas and more!) It’s a true multi-purpose kitchen gadget, and the storage cannot be beat- the silicone tray is perfect for freezing a lot of different baby food purees, and now that Zach doesn’t eat as many purees, it’s good for freezing little mini pudding pops for Zach, which are super soothing on his gums! I can’t live without this! (Image linked again)

Ultimately, you have to choose the right foods for your child, but a lot of it is about mixing and matching, and building meals around what your child likes. Just remember the simple principles- Remember your food pyramid, and make sure your child is getting a rainbow of colors!


